Category: Uncategorized

  • How to Troubleshoot Overheating in Windows laptops

    How to Troubleshoot Overheating in Windows laptops

    Is your Windows laptop feeling unusually hot? Are the fans spinning loudly and constantly, or is your laptop suddenly slowing down during tasks it used to handle just fine? These are classic signs of overheating. And while it’s a common issue, it shouldn’t be ignored—it can slow down your laptop (thanks to thermal throttling), shorten your device’s lifespan, and even lead to unexpected shutdowns.

    Overheating usually kicks in when your laptop’s cooling system can’t keep up with the heat churned out by your CPU and GPU. This might be due to dust blocking vents, outdated drivers, or too many background processes running at once.

    Let’s walk through a practical, step-by-step guide to troubleshoot overheating on a Windows laptop. We’ll go from the quick fixes to the more involved stuff—so you can hopefully stop your machine from turning into a mini space heater.

    Step 1: Immediate Actions and Environmental Checks

    Start with the basics. These might seem too simple, but they often make a surprising difference.

    1. Elevate Your Laptop
      Avoid using your laptop on soft surfaces like your bed or couch. These can block airflow. Instead, place it on a hard, flat surface—like a desk, a book, or a proper cooling pad.
    2. Check the Vents
      Take a moment to locate all the intake and exhaust vents (usually on the sides, back, or bottom). Make sure nothing is blocking them.
    3. Consider Room Temperature
      If you’re in a warm or poorly ventilated room, your laptop’s cooling system has to work that much harder. A cooler environment can definitely help.
    4. Restart the Laptop
      Sometimes a good old reboot clears up software bugs or runaway background processes causing the CPU or GPU to overheat.

    Step 2: Clean the Vents and Fans (This Is Big)

    Dust is the most common—and overlooked—culprit. Over time, it clogs the heatsinks and smothers the fans.

    1. Power Down and Unplug your laptop before cleaning.
    2. Locate the Vents and note where the fans are likely positioned inside.
    3. Use Compressed Air
      Get a can of compressed air. Use short bursts angled into the vents to dislodge dust. Hold the can upright to avoid releasing liquid propellant.

      • Tip: If you can, gently stop the fan blades from spinning (maybe with a toothpick) while you clean. Spinning them at high speed can damage the motor.
    4. Wipe Down Exterior Surfaces with a microfiber cloth.

    Do this every few months—more often if you have pets or live in a dusty area.

    Step 3: Check Background Processes

    High CPU or GPU usage from hidden processes can quietly generate tons of heat.

    1. Open Task Manager (Ctrl + Shift + Esc)
      Go to the “Processes” tab and sort by CPU or GPU usage.
    2. Close Resource-Hungry Apps you’re not actively using.
    3. End Rogue Processes
      Right-click and select “End task”—but double-check the process isn’t something critical.
    4. Manage Startup Programs under the “Startup” tab to reduce what auto-launches when you boot your laptop.
    5. Run a Malware Scan just in case some hidden process is working your CPU overtime without your knowledge.

    Step 4: Tweak Power Plan Settings

    Reducing your processor’s top speed can lower heat—especially if you don’t need peak performance all the time.

    1. Open Power Options from the Control Panel or Settings.
    2. Modify Your Active Plan
      Click “Change plan settings” > “Change advanced power settings.”
    3. Adjust Processor Power Management
      Lower the “Maximum processor state”—try 90% or 95%. For hotter systems, even 80% might help, though it’ll slow things down.

    Step 5: Update Drivers and Windows

    Outdated drivers can be surprisingly inefficient, causing your laptop to work harder than it needs to.

    1. Update Graphics Drivers
      Visit NVIDIA, AMD, or Intel’s website and get the latest for your model.
    2. Update Chipset Drivers from your laptop manufacturer’s website.
    3. Run Windows Update and install any pending updates.

    Step 6: Try a Laptop Cooling Pad

    A good cooling pad can make a noticeable difference. Look for one with fans that align well with your laptop’s intake vents.

    Step 7: Advanced Maintenance (For the Bold)

    If you’re comfortable opening up your laptop…

    1. Open the Back Panel (check your model’s teardown guide first).
    2. Clean Internals
      Use compressed air and a brush to gently clean the fans and heatsinks.
    3. Reapply Thermal Paste
      Carefully remove the heatsink, clean off old paste with isopropyl alcohol, and apply a new dot of quality thermal paste.

    This step isn’t for everyone, but it can make a huge difference if the paste has dried out.

    Step 8: Get Professional Help

    Still overheating? It might be a faulty fan, heat pipe, or even the CPU itself. Contact support or take your laptop to a trusted repair shop.

    FAQ

    Q1: What causes laptop overheating?

    Mainly: dust buildup, blocked vents, too many background apps, old thermal paste, outdated drivers, and warm room temperatures.

    Q2: How do I know if it’s overheating and not just warm?

    Look for excessive fan noise, very hot surfaces, performance slowdowns, or sudden shutdowns. Tools like HWMonitor can show you CPU/GPU temps. Generally, keep CPUs under 90°C and GPUs below 85°C.

    Q3: Are cooling pads really effective?

    Yes, especially during heavy tasks like gaming. They provide extra airflow where your laptop needs it most.

    Q4: How often should I clean dust out of my laptop?

    Every 3–6 months externally. Internal cleaning can be yearly if you’re comfortable opening the case.

    Q5: What is thermal paste and why does it matter?

    It helps transfer heat from your CPU/GPU to their heatsinks more efficiently. Over time it dries out and needs replacing to keep your system cool.
  • How to Tweak Performance Settings using Group Policy Editor

    How to Tweak Performance Settings using Group Policy Editor

    Windows provides a variety of performance tuning options through the Group Policy Editor—a powerful tool that allows administrators and advanced users to configure system behavior at a granular level. While most users rely on Task Manager or Settings for basic optimization, using Group Policy Editor (gpedit.msc) allows deeper control over background processes, UI effects, resource limits, and more.

    I’ve personally used Group Policy to fine-tune Windows machines in development and enterprise environments to reduce lag, control background resource usage, and improve system responsiveness. In this guide, I’ll walk you through how to tweak performance settings using Group Policy Editor effectively and safely.

    What Is Group Policy Editor?

    Group Policy Editor is a Windows management console that lets you configure operating system settings and enforce rules across a local machine or network. It is available in:

    • Windows 10 and 11 Pro, Enterprise, and Education editions
    • Not available by default in Home Edition

    To open it:

    • Press Windows + R, type gpedit.msc, and hit Enter

    With Group Policy, you can adjust settings that are otherwise not exposed in the standard Settings app or Control Panel.

    Why Use Group Policy for Performance Tweaks?

    Group Policy allows you to:

    • Disable unnecessary UI effects
    • Prevent background apps from running
    • Manage memory and CPU prioritization
    • Control indexing and search-related features
    • Limit unnecessary telemetry and scheduled tasks

    Unlike third-party optimizers, this method gives you native control without installing external software or risking malware.

    Important Notes Before You Start

    • Create a restore point before making changes
    • Document any settings you modify, in case you want to revert
    • Use gpupdate /force to apply changes immediately, or restart your system

    Step-by-Step: Tweaking Performance Settings in Group Policy Editor

    1. Disable Unnecessary Visual Effects

    Reducing animations and effects can noticeably speed up system performance on lower-end machines.

    Path:
    Computer Configuration > Administrative Templates > System > Performance Control

    Policy: Turn off Windows visual effects

    Steps:

    1. Double-click the policy
    2. Set it to Enabled
    3. Select the effects to disable (e.g., menu fade, animation in taskbar)
    4. Click Apply, then OK

    Disabling these effects helps improve responsiveness, especially on systems with integrated graphics.

    1. Prevent Apps from Running in the Background

    This reduces memory and CPU consumption.

    Path:
    Computer Configuration > Administrative Templates > Windows Components > App Privacy

    Policy: Let Windows apps run in the background

    Steps:

    1. Double-click the policy
    2. Set it to Enabled
    3. Choose Force Deny from the dropdown
    4. Click Apply, then OK

    This prevents all Microsoft Store apps from consuming resources when not actively in use.

    1. Disable Indexing on Low-Performance Systems

    Search indexing improves search speed but can consume CPU and disk resources.

    Path:
    Computer Configuration > Administrative Templates > Windows Components > Search

    Policy: Do not allow locations on removable drives to be added to libraries
    Policy: Prevent indexing of certain paths

    Steps:

    1. Enable both policies
    2. Add directories like Downloads or Media folders to exclude from indexing

    If you rarely use Windows Search, this can reduce disk I/O on older hardware.

    1. Disable Superfetch (SysMain) and Prefetch

    These services preload frequently used apps into memory but can slow down older HDD-based systems.

    Path:
    Computer Configuration > Administrative Templates > System > PrefetchParameters

    Policy: Enable Superfetch and Enable Prefetcher

    Steps:

    1. Set both policies to Disabled
    2. Click Apply, then OK

    This setting is most effective on systems using spinning hard drives. SSDs benefit less from prefetching.

    1. Configure Processor Scheduling

    You can give foreground apps priority over background services.

    Path:
    Computer Configuration > Administrative Templates > System > Processor Scheduling

    Policy: Optimize processor scheduling for foreground applications

    Steps:

    1. Set to Enabled
    2. Choose Foreground applications
    3. Apply and restart

    I’ve used this setting on workstations running productivity or design software to ensure faster performance.

    1. Limit Scheduled Tasks During Active Use

    This prevents maintenance tasks from running while you’re using the system.

    Path:
    Computer Configuration > Administrative Templates > Windows Components > Maintenance Scheduler

    Policy: Prevent scheduled maintenance during policy-defined active hours

    Steps:

    1. Enable the policy
    2. Define working hours (e.g., 9 AM to 8 PM)
    3. Apply changes

    This keeps Windows Update and disk cleanup tasks from running when you’re working.

    1. Disable Tips, Suggestions, and Consumer Features

    These features consume memory and bandwidth unnecessarily.

    Path:
    Computer Configuration > Administrative Templates > Windows Components > Cloud Content

    Policy: Do not show Windows tips

    Path:
    Computer Configuration > Administrative Templates > Windows Components > Content Delivery Manager

    Policy: Turn off Microsoft consumer experiences

    Steps:

    1. Set both policies to Enabled
    2. Click Apply, then OK

    This helps remove distractions and reduce unnecessary background communication with Microsoft servers.

    1. Limit Windows Error Reporting

    Error reports can send system crash logs and telemetry in the background.

    Path:
    Computer Configuration > Administrative Templates > Windows Components > Windows Error Reporting

    Policy: Disable Windows Error Reporting

    Steps:

    1. Set to Enabled
    2. Click Apply, then OK

    On critical systems, you might want to keep error reporting enabled. Otherwise, it can be safely turned off for performance.

    1. Use Disk Quotas and Memory Management Policies

    These help prevent users or background services from consuming too much disk or RAM.

    Path:
    Computer Configuration > Administrative Templates > System > Disk Quotas
    Policy: Enable disk quotas

    You can define:

    • Warning levels
    • Limits per user
    • Logging of quota violations

    Also, you can configure paging file policies through:
    Computer Configuration > Administrative Templates > System > Memory Management

    Apply and Confirm the Policies

    After applying all settings:

    1. Open Command Prompt as Administrator
    2. Run:

    cmd

    CopyEdit

    gpupdate /force

    This forces an immediate update of group policies.

    To verify, you can use:

    cmd

    CopyEdit

    gpresult /h C:\gp-report.html

    Open the HTML report to confirm which policies were applied.

    Best Practices

    • Test policies one at a time if you’re unsure how they’ll affect system behavior
    • Keep a backup of your Group Policy settings using LGPO.exe (Local Group Policy Object tool)
    • Document all changes for future reference or system recovery
    • Use these settings alongside disk cleanup, startup optimization, and driver updates for full system performance gains

    Conclusion

    Tuning Windows performance using Group Policy Editor provides more control than most users realize. From disabling visual effects and background services to managing memory and CPU priorities, these policies can make a noticeable difference—especially on machines with limited hardware.

    I’ve relied on these tweaks for speeding up systems used in environments ranging from media production to classroom management. With proper configuration and caution, Group Policy can be one of your most powerful tools for improving Windows efficiency.

  • How to Install Windows 11 on Unsupported Hardware

    How to Install Windows 11 on Unsupported Hardware

    Windows 11 comes with specific hardware requirements, such as TPM 2.0, Secure Boot, and compatible processors. However, many users have older PCs that don’t meet these criteria but still want to install Windows 11. This guide will explain how to install Windows 11 on unsupported hardware safely and effectively, based on the latest methods and best practices.

    Understanding Windows 11 Hardware Requirements

    Microsoft requires:

    • A compatible 64-bit processor (8th Gen Intel or newer, AMD Ryzen 2000 or newer).
    • TPM 2.0 module enabled.
    • UEFI firmware with Secure Boot capability.
    • 4GB RAM and 64GB storage minimum.

    If your PC lacks any of these, the standard Windows 11 installer may block installation.

    Important Note on Unsupported Installation

    Installing Windows 11 on unsupported hardware can cause:

    • No official updates or security patches.
    • Possible instability or performance issues.
    • Compatibility problems with some apps or drivers.

    Proceed only if you understand these risks and have backups ready.

    Step 1: Backup Your Data

    Before proceeding:

    • Backup important files to external storage or cloud.
    • Creating a system image or restore point is recommended.
    • This protects your data if something goes wrong.

    Step 2: Prepare Windows 11 Installation Media

    Download the official Windows 11 ISO from Microsoft’s website.

    • Use the Media Creation Tool or download the ISO directly.
    • Create a bootable USB drive using tools like Rufus.
    • Choose GPT partition scheme and UEFI target system for compatibility.

    Step 3: Bypass TPM and Secure Boot Checks

    There are multiple ways to bypass Windows 11 hardware checks:

    Method A: Registry Edit During Installation

    • Boot from Windows 11 USB.
    • When the “This PC can’t run Windows 11” message appears, press Shift + F10 to open Command Prompt.
    • Type regedit and press Enter.
    • Navigate to:
      HKEY_LOCAL_MACHINE\SYSTEM\Setup
    • Right-click Setup, select New > Key, name it LabConfig.
    • Under LabConfig, create new DWORD (32-bit) values:
      • BypassTPMCheck and set value to 1
      • BypassSecureBootCheck and set value to 1
      • BypassRAMCheck (optional) set to 1 if needed
    • Close Registry Editor and Command Prompt.
    • Click Back and continue installation.

    Method B: Modify Installation ISO Using Third-Party Tools

    • Tools like Rufus offer options to disable TPM/Secure Boot checks when creating bootable media.
    • Select the option to bypass hardware checks during ISO creation.

    Step 4: Install Windows 11 Normally

    With checks bypassed, continue installation as usual:

    • Select language, keyboard layout, and partition.
    • Perform a clean install or upgrade.

    Step 5: Install Drivers and Updates

    After installation:

    • Install drivers compatible with your hardware from manufacturer websites.
    • Windows Update may fail due to unsupported hardware, but manual driver installation helps.
    • Use third-party tools to check for updates.

    Step 6: Enable Windows Update (Optional and Risky)

    To receive updates, use registry tweaks or scripts available online to force update access on unsupported PCs. This is unofficial and may cause instability.

    Step 7: Monitor System Stability

    After installation:

    • Watch for crashes, performance issues.
    • Keep backups and be ready to revert if needed.

    Additional Tips From Experience

    • TPM can sometimes be enabled in BIOS even if not detected.
    • Some PCs may support Secure Boot after BIOS update.
    • If upgrading from Windows 10, a clean install often works better on unsupported hardware.

    Conclusion

    Installing Windows 11 on unsupported hardware is possible by bypassing TPM and Secure Boot checks using registry edits or modified installation media. While this enables use on older PCs, it comes with risks regarding updates and stability. Back up your data, proceed carefully, and monitor system health.

  • How to Fix Windows Update Error 0x80070002

    How to Fix Windows Update Error 0x80070002

    Windows Update errors can be frustrating, especially when they prevent your system from installing important updates. One common issue users face is the Windows Update error 0x80070002. This error typically means that some update files are missing or corrupted. Fortunately, it can be fixed with a few straightforward troubleshooting steps. This article will guide you through several effective solutions to resolve error 0x80070002.

    Understanding Error 0x80070002

    Error code 0x80070002 occurs when Windows Update cannot locate required files or detects corrupted system files. It usually happens during or after downloading updates. Causes include:

    • Incorrect system time and date settings.
    • Corrupted or incomplete update files.
    • Damaged Windows Update components.
    • Issues with the SoftwareDistribution folder.

    Step 1: Check Date and Time Settings

    Incorrect system time or date can disrupt Windows Update.

    • Right-click on the Date and Time on the taskbar.
    • Select Adjust date/time.
    • Enable Set time automatically and Set time zone automatically.
    • Click Sync now under Synchronize your clock.
    • Restart your PC and try updating again.

    Step 2: Run Windows Update Troubleshooter

    Windows has a built-in troubleshooter designed to fix update errors automatically.

    • Open Settings by pressing Windows + I.
    • Navigate to System > Troubleshoot > Other troubleshooters.
    • Find Windows Update and click Run.
    • Follow the on-screen instructions.
    • After completion, restart your computer and retry the update.

    Step 3: Delete Corrupted Update Files

    The SoftwareDistribution folder stores temporary update files that may become corrupted.

    • Open File Explorer and navigate to:
      C:\Windows\SoftwareDistribution\Download
    • Delete all files and folders inside the Download folder.
    • This clears downloaded update files, forcing Windows to re-download them fresh.
    • After deletion, restart your PC and check for updates.

    Step 4: Restart Windows Update Services

    Sometimes Windows Update services may stop or malfunction.

    • Press Windows + R, type services.msc, and press Enter.
    • In the Services window, locate:
      • Windows Update
      • Background Intelligent Transfer Service (BITS)
    • Right-click each service and select Stop.
    • Wait a few seconds, then right-click and select Start.
    • Close the Services window and try updating again.

    Step 5: Run System File Checker (SFC)

    Corrupted system files can cause update errors.

    • Open Command Prompt as administrator (search for cmd, right-click, Run as administrator).
    • Type sfc /scannow and press Enter.
    • The scan will check for and repair corrupted system files.
    • Restart your PC when the scan completes.

    Step 6: Run Deployment Image Servicing and Management (DISM) Tool

    If SFC doesn’t fix all issues, DISM repairs the Windows image.

    • Open Command Prompt as administrator.
    • Type DISM /Online /Cleanup-Image /RestoreHealth and press Enter.
    • Wait for the process to complete (may take several minutes).
    • Restart your PC.

    Step 7: Reset Windows Update Components Manually

    If problems persist, reset all Windows Update components:

    • Open Command Prompt as administrator.
    • Stop Windows Update services using commands for BITS, Windows Update, and Cryptographic Services.
    • Rename the SoftwareDistribution and Catroot2 folders to back them up.
    • Restart the services you stopped.
    • This resets update files and services to default states.

    Step 8: Check for Malware

    Malware infection can interfere with Windows Update.

    • Run a full system scan using Windows Defender or a reputable antivirus program.
    • Remove any detected threats and restart your PC.

    Step 9: Free Up Disk Space

    Insufficient disk space can cause update failures.

    • Open Settings > System > Storage.
    • Use Storage Sense or manually delete unnecessary files.
    • Aim to free at least 10 GB for updates.
    • Retry the update after cleaning.

    Step 10: Perform a Clean Boot

    Conflicting startup programs can block updates.

    • Press Windows + R, type msconfig, and press Enter.
    • In the System Configuration window, go to the Services tab.
    • Check Hide all Microsoft services, then click Disable all.
    • Go to the Startup tab and open Task Manager.
    • Disable all startup items.
    • Restart your PC and try the update again.

    Final Thoughts

    Windows Update error 0x80070002 can seem complex but is often resolved by following these troubleshooting steps. Start with simple fixes like correcting the time or running the troubleshooter, then proceed to resetting update components if needed. Regular maintenance, including running SFC and DISM, keeps your system healthy and reduces update errors.

  • How to Check System Specs in Windows

    How to Check System Specs in Windows

    Dual booting allows you to install both Windows and Linux on the same computer and choose which operating system (OS) to use at startup. This setup is popular among developers, IT professionals, and tech enthusiasts who want the flexibility of both platforms without needing separate machines. In this detailed guide, I will walk you through how to set up a dual boot system safely and correctly, covering everything from preparation to installation and troubleshooting.

    Why Set Up Dual Boot with Windows and Linux?

    Dual booting gives you the best of both worlds:

    • Use Windows for gaming, specific software, or everyday tasks.
    • Use Linux for development, privacy, and open-source tools.
    • Test Linux distributions without removing Windows.
    • Customize your computing environment based on need.

    What You Need Before Starting

    • A PC with Windows already installed or a blank PC.
    • At least 50 GB of free disk space (preferably more) for Linux.
    • A USB drive (4 GB or more) to create a Linux bootable installer.
    • A Linux distribution ISO (Ubuntu, Fedora, Mint, etc.).
    • A backup of your important data to prevent loss.

    Step 1: Prepare Your Windows System

    Backup Important Data

    Always back up your important files to an external drive or cloud storage. Mistakes during partitioning can cause data loss.

    Free Up Disk Space for Linux

    1. Open Disk Management:
      • Press Windows + X and select Disk Management.
    2. Find your Windows partition (usually C:).
    3. Right-click and select Shrink Volume.
    4. Enter the amount of space to shrink (at least 50 GB recommended).
    5. Click Shrink.

    This will create unallocated space where Linux will be installed.

    Step 2: Download and Create Linux Bootable USB

    1. Download the Linux ISO from the official site of your chosen distribution.
    2. Use tools like Rufus or Balena Etcher to create a bootable USB drive:
      • Insert USB.
      • Open the tool.
      • Select the ISO file.
      • Start the creation process.

    Step 3: Configure BIOS/UEFI Settings

    To boot from USB:

    1. Restart your PC and enter BIOS/UEFI settings (usually by pressing Del, F2, or F12 during startup).
    2. Disable Secure Boot if your Linux distribution doesn’t support it.
    3. Set USB drive as the first boot device in the boot order.
    4. Save and exit BIOS.

    Step 4: Boot into Linux Installer

    1. Insert the bootable USB and restart your PC.
    2. The system should boot from USB and display the Linux installer.
    3. Select Try Linux if you want to test, or Install Linux to begin installation.

    Step 5: Install Linux Alongside Windows

    During installation:

    1. When asked about installation type, select Install Linux alongside Windows if available. This option automatically partitions the free space.

    If not available:

      • Choose Something else to manually partition.
    1. For manual partitioning:
      • Select the free space.
      • Create a partition for root / (minimum 20 GB, format as ext4).
      • Optionally create a swap partition (size equal to RAM if you want hibernation).
      • Create a /home partition for personal files (optional).
    2. Select the device for the bootloader installation (usually the main disk, e.g., /dev/sda).

    Step 6: Complete Installation and Reboot

    1. Follow the prompts to complete installation (time zone, username, password).
    2. Remove the USB when prompted.
    3. Reboot your system.

    Step 7: Select OS at Boot Using GRUB

    • After reboot, you will see the GRUB bootloader menu.
    • Choose Linux or Windows to boot into either OS.
    • If Windows doesn’t appear, boot into Linux and update GRUB:
      • Open terminal.
      • Run sudo update-grub.
      • Reboot.

    Troubleshooting Common Issues

    Issue 1: No Boot Menu Showing

    • Check BIOS boot order to ensure the disk with GRUB is prioritized.
    • Repair GRUB using Linux live USB and boot-repair tool.

    Issue 2: Windows Not Booting

    • Use Windows recovery media to repair the bootloader.
    • Reinstall GRUB after Windows repair.

    Issue 3: Linux Installation Fails

    • Verify ISO integrity by checking checksum.
    • Try a different USB or creation tool.

    My Experience with Dual Booting

    I set up dual boot on my laptop to use Windows for work apps and Linux for programming. Shrinking the Windows partition via Disk Management was straightforward. Installing Ubuntu alongside Windows using the automatic option saved time. GRUB bootloader made switching easy. Occasionally, after Windows updates, GRUB needed a quick repair, but overall, the system was stable and convenient.

    Summary

    Setting up dual boot with Windows and Linux involves:

    • Backing up data and shrinking Windows partition.
    • Creating a bootable Linux USB.
    • Adjusting BIOS settings.
    • Installing Linux alongside Windows.
    • Managing GRUB bootloader to choose OS at startup.

    This process provides flexibility and access to the strengths of both operating systems.

  • How to Disable Windows Animations to Improve Performance

    How to Disable Windows Animations to Improve Performance

    Windows animations make transitions and UI interactions look smooth and modern. From fading menus to sliding windows, these effects are designed to enhance visual appeal. However, on older systems or devices with limited resources, these animations can negatively impact performance.

    Disabling these Windows visual effects can lead to a noticeable boost in speed, especially on low-end PCs. This guide explains how to disable Windows animations step-by-step using built-in settings. I’ll also share my personal experience and tips for users looking to optimize their system for speed.

    Why Disable Windows Animations?

    Turning off animations can:

    • Improve responsiveness on slow or aging devices
    • Free up system resources like CPU and memory
    • Enhance usability for those who prefer faster feedback
    • Reduce distractions for users with accessibility needs

    If you notice delays when opening or closing windows, minimizing programs, or navigating the interface, animations could be contributing to the lag.

    How to Disable Windows Animations: All Methods Explained

    Windows offers several ways to disable animations. Below, I’ll walk you through each method in detail.

    Method 1: Using Performance Options (System Settings)

    This is the most effective method and the one I use regularly when setting up low-spec laptops or virtual machines.

    Step 1: Open Performance Options

    1. Press Windows + R to open the Run dialog.
    2. Type SystemPropertiesPerformance and press Enter.

    This opens the Performance Options window.

    Step 2: Adjust for Best Performance

    1. In the Visual Effects tab, select Adjust for best performance.
      This will uncheck all animation-related options.
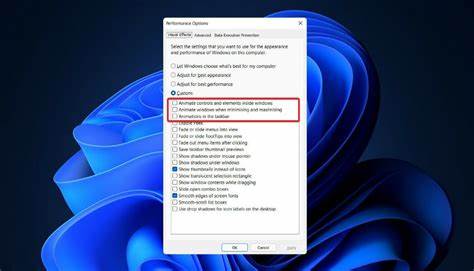
    2. Alternatively, choose Custom, and uncheck the following boxes:
      • Animate controls and elements inside windows
      • Animate windows when minimizing and maximizing
      • Animations in the taskbar
      • Fade or slide menus into view
      • Fade or slide ToolTips into view
      • Fade out menu items after clicking
      • Slide open combo boxes
      • Smooth-scroll list boxes
    3. Click Apply, then OK.

    You will notice the immediate change in how the UI behaves. Menus will appear instantly without transition effects.

    Method 2: Disable Animations via Windows Settings (Windows 11 and 10)

    This method is simpler and more suitable for beginners.

    Step 1: Open Accessibility Settings

    1. Press Windows + I to open Settings.
    2. Go to Accessibility (called Ease of Access in Windows 10).
    3. Select Visual effects from the sidebar.

    Step 2: Turn Off Animation Effects

    1. Toggle Animation effects to Off.

    This disables most system animations, including fading menus and taskbar transitions. It’s a lightweight method and doesn’t affect other visual features like font rendering.

    Method 3: Use the Registry Editor (Advanced Users Only)

    This method is for users who prefer direct registry tweaks. Proceed with caution.

    Step 1: Open Registry Editor

    1. Press Windows + R, type regedit, and press Enter.
    2. Navigate to:

    mathematica

    CopyEdit

    HKEY_CURRENT_USER\Control Panel\Desktop

    Step 2: Modify Animation Keys

    Look for these entries and set their values to 0:

    • MenuShowDelay – Set to 0 (faster menu response)
    • UserPreferencesMask – This value requires binary editing and is not recommended unless you are experienced with hex values.

    It’s safer to use the Performance Options method unless you know exactly what you’re doing in the registry.

    Method 4: Use Group Policy Editor (Windows Pro Editions)

    Available only in Windows 10/11 Pro, Enterprise, or Education versions.

    Step 1: Open Local Group Policy Editor

    1. Press Windows + R, type gpedit.msc, and press Enter.

    Step 2: Navigate to Animation Settings

    1. Go to:
      User Configuration > Administrative Templates > Control Panel > Personalization
    2. Double-click Turn off all Windows animation.
    3. Select Enabled, click Apply, and then OK.

    You may need to restart your system for the change to take effect.

    What Changes After Disabling Animations?

    Once animations are turned off:

    • Windows menus will open instantly.
    • Windows minimize/maximize without the fade or slide effect.
    • Hovering and clicking feel more immediate.
    • Taskbar icons respond faster, especially on slower devices.

    You lose some visual polish, but the trade-off in speed and responsiveness is often worth it.

    Who Should Disable Windows Animations?

    Based on my experience, I recommend disabling animations if:

    • You are using a low-spec device (2–4 GB RAM, HDD instead of SSD).
    • You want a minimalist experience with faster feedback.
    • You are setting up a system for older users or for basic office tasks.
    • You’re running Windows in a virtual machine.
    • You’re troubleshooting performance issues post-update or install.

    On newer machines with SSDs and 8 GB+ RAM, the performance gain may be minimal—but still useful for power users who prioritize speed.

    Additional Tips to Improve Windows Performance

    Disabling animations is just one step. You can further enhance speed by:

    • Disabling startup programs in Task Manager.
    • Switching to High Performance power mode.
    • Cleaning up background apps in Settings.
    • Updating drivers and running disk cleanup regularly.
    • Keeping system bloatware-free.

    My Personal Experience

    Whenever I work with refurbished laptops or set up Windows for relatives, the first thing I do is disable unnecessary visual effects. The results are always immediate. Even older systems feel snappy again.

    On my personal setup, I use a hybrid approach—disabling most animations but keeping a few that help with visual context, like taskbar animations. This way, I get a balance of speed and usability.

    Conclusion

    Disabling Windows animations is a simple, effective way to speed up your PC—especially if you use an older or entry-level system. Whether you’re a regular user looking to improve responsiveness or someone setting up a clean, fast environment, this guide gives you everything you need to do it right. Choose the method that best fits your skill level. From the straightforward Settings menu to the detailed Performance Options panel, each method helps you remove the unnecessary visual delay that can drag down your system.

  • How to Share files Between Windows PCs on Same Network

    How to Share files Between Windows PCs on Same Network

    Sharing files between Windows PCs on the same local network is one of the most efficient ways to transfer data without needing USB drives or cloud services. Whether you’re working in a home office, a small business, or a multi-device environment, Windows provides several built-in options for network file sharing. In this comprehensive how-to article, I’ll walk you through different ways to share files securely and easily between two or more Windows computers on the same network.

    Why Use Network File Sharing?

    From my own experience setting up a small work-from-home system, network sharing has helped me avoid repeated emailing of files and juggling external drives. Here are a few benefits:

    • Centralizes storage and access.
    • Enables collaboration between multiple users.
    • Faster than using cloud storage for large files on local networks.

    Requirements Before You Start

    To ensure a smooth sharing experience, make sure:

    1. All PCs are connected to the same network (Wi-Fi or LAN).
    2. File sharing and network discovery are enabled.
    3. Windows Firewall or antivirus software isn’t blocking file sharing.
    4. You’re using a Private Network profile on each PC (not Public).

    Step 1: Set the Network Profile to Private

    Setting the network to private ensures your PC is discoverable to others on the same network.

    • Windows 11:
      1. Go to Settings > Network & Internet > Wi-Fi or Ethernet.
      2. Click on the connected network.
      3. Choose Private network.
    • Windows 10:
      1. Go to Settings > Network & Internet > Status.
      2. Click Change connection properties.
      3. Select Private.

    Step 2: Enable File and Printer Sharing

    1. Open Control Panel.
    2. Go to Network and Sharing Center.
    3. Click Change advanced sharing settings.
    4. Under the Private profile:
      • Turn on Network discovery.
      • Turn on File and printer sharing.
    5. Save changes.

    This enables other PCs to discover your machine and access shared folders.

    Step 3: Share a Folder

    To share a specific folder with another PC:

    1. Right-click the folder > Select Properties.
    2. Go to the Sharing tab.
    3. Click on Share.
    4. In the dialog box, select Everyone from the dropdown menu and click Add.
    5. Choose Read or Read/Write permission.
    6. Click Share and then Done.

    This allows any PC on the same network to access that folder, depending on the permissions you’ve set.

    Step 4: Access the Shared Folder from Another PC

    Method 1: Via Network Explorer

    1. Open File Explorer.
    2. Click on Network in the left-hand pane.
    3. You should see the name of the other PC listed.
    4. Double-click it and open the shared folder.
    5. Enter the username and password of the other PC if prompted.

    Tip: If you’re not seeing the shared computer, make sure that Network Discovery is enabled on both systems.

    Method 2: Directly Use the Path

    1. Press Win + R to open the Run dialog box.
    2. Type:

    CopyEdit

    \\ComputerName\SharedFolderName

    Replace ComputerName with the name of the computer that is sharing the file, and SharedFolderName with the folder name.

    1. Press Enter.

    Step 5: Map a Shared Folder as a Network Drive (Optional)

    If you regularly use the shared folder, you can map it as a network drive.

    1. Open File Explorer > Go to This PC.
    2. Click on Map network drive in the toolbar.
    3. Choose a Drive letter.
    4. In the Folder box, type:

    CopyEdit

    \\ComputerName\SharedFolderName

    1. Check Reconnect at sign-in if you want it to stay mapped.
    2. Click Finish.

    Now, the folder will appear as a local drive on your PC.

    Alternative: Use Nearby Sharing

    For quick, wireless file transfers between Windows 10 and 11 PCs, you can use Nearby Sharing.

    How to Enable:

    1. Go to Settings > System > Nearby Sharing.
    2. Turn it ON.
    3. Choose Everyone nearby or My devices only.

    To Share a File:

    1. Right-click any file.
    2. Select Share.
    3. Choose the nearby PC listed under Nearby Sharing.

    The recipient will get a prompt to accept the file.

    Advanced Option: Use HomeGroup (for older Windows versions)

    HomeGroup has been removed from Windows 10 (version 1803 onwards), but if you’re on an older system, you might still be using it. This allowed easy sharing of libraries like Documents, Pictures, and Printers. It’s no longer recommended due to security and support limitations.

    Troubleshooting Tips

    • Folder not showing up: Make sure the folder is shared with the right permissions and that Network Discovery is ON.
    • Access denied: Check if the file/folder permissions include ‘Everyone’ or specific user credentials.
    • Can’t find the other PC: Ensure both PCs are on the same network and set to “Private”.
    • Firewall blocking access: Temporarily disable Windows Defender Firewall to test the connection.

    Security Considerations

    • Avoid using “Everyone” for sensitive folders. Instead, share with a specific user account.
    • Use strong Windows account passwords to prevent unauthorized access.
    • Disable sharing when not needed, especially on public networks.

    Conclusion

    Sharing files between Windows PCs on the same network is both convenient and efficient. Whether you’re working in a small office or managing multiple devices at home, using built-in Windows sharing features like folder sharing, Nearby Sharing, and network drive mapping can simplify your workflow. With just a few steps, you can set up a secure and reliable local file-sharing environment that keeps you productive.

  • How to Disable Location Tracking on Windows 11

    How to Disable Location Tracking on Windows 11

    Disabling location tracking in Windows 11 is essential for maintaining your privacy and ensuring that applications only access necessary information. Windows 11 offers built-in settings to control location services, allowing you to manage which apps can access your location data. This guide provides a step-by-step approach to disable location tracking effectively.

    Understanding Location Services in Windows 11

    Windows 11 uses location services to provide personalized experiences, such as weather updates, directions, and location-based reminders. These services determine your device’s location using GPS, Wi-Fi, cellular networks, and IP addresses. While convenient, this feature can raise privacy concerns for some users.

    Step-by-Step Guide to Disable Location Tracking

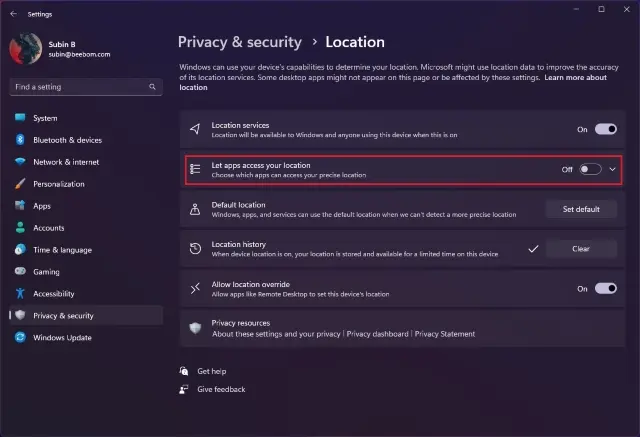
    1. Access Location Settings
    • Press Windows + I to open the Settings app.
    • Navigate to Privacy & security in the left-hand menu.
    • Click on Location under the App permissions section.
    1. Turn Off Location Services
    • In the Location settings, you’ll see a toggle switch labeled Location services.
    • Set this switch to Off to disable location tracking for all users on the device.

    Disabling this setting will prevent Windows and apps from accessing your device’s location.

    Managing Location Access for Individual Apps

    If you prefer to allow certain apps to access your location while restricting others, follow these steps:

    • Ensure Location services is turned On.
    • Under Let apps access your location, you’ll see a list of apps that have requested location access.
    • Use the toggle switches next to each app to grant or deny location access individually.

    This approach allows you to maintain functionality for apps that require location data while protecting your privacy from others.

    Clearing Location History

    Even after disabling location services, your device may retain previously collected location data. To clear this history:

    • In the Location settings, scroll down to Location history.
    • Click the Clear button to remove stored location data from your device.

    Regularly clearing your location history helps maintain your privacy.

    Disabling Location Access for Desktop Apps

    Some desktop applications, especially those not downloaded from the Microsoft Store, may access location data differently. To restrict these apps:

    • In the Location settings, locate the Let desktop apps access your location section.
    • Toggle this setting to Off to prevent desktop apps from accessing your location.

    Note that some desktop apps might still determine your location using other methods, such as IP address.

    Additional Methods to Disable Location Services

    Using Group Policy Editor (For Windows 11 Pro, Enterprise, and Education)

    If you’re using a compatible edition of Windows 11, you can disable location services through the Group Policy Editor:

    • Press Windows + R, type gpedit.msc, and press Enter.
    • Navigate to Computer Configuration > Administrative Templates > Windows Components > Location and Sensors.
    • Double-click Turn off location and set it to Enabled.
    • Click OK to apply the changes.

    This method enforces the setting across all users on the device.

    Using Registry Editor

    For advanced users, modifying the Windows Registry can disable location services:

    • Press Windows + R, type regedit, and press Enter.
    • Navigate to HKEY_LOCAL_MACHINE\SOFTWARE\Microsoft\Windows\CurrentVersion\CapabilityAccessManager\ConsentStore\location.
    • Double-click the Value entry and change its data to Deny.
    • Click OK and restart your computer to apply the changes.

    Editing the registry can have unintended consequences. Ensure you back up the registry before making changes.

    Personal Experience

    In my experience, disabling location services has been beneficial for maintaining privacy. I noticed that after turning off location tracking, certain apps prompted for location access, allowing me to make informed decisions about granting permissions. Regularly reviewing and managing these settings ensures that only trusted applications have access to sensitive information.

    Conclusion

    Managing location services in Windows 11 is straightforward and provides control over your privacy. Whether you choose to disable location tracking entirely or manage permissions for individual apps, these settings empower you to protect your personal information. Regularly reviewing these settings ensures that your device operates in line with your privacy preferences.

  • How to Set Up a Local Network Between Two Windows PCs

    How to Set Up a Local Network Between Two Windows PCs

    Setting up a local network between two Windows PCs allows for efficient file sharing, printer access, and collaborative work without relying on internet connectivity. This guide provides a comprehensive, step-by-step approach to establish a local network using both wired and wireless methods, ensuring compatibility with Windows 10 and Windows 11 systems.

    Prerequisites

    Before initiating the setup:

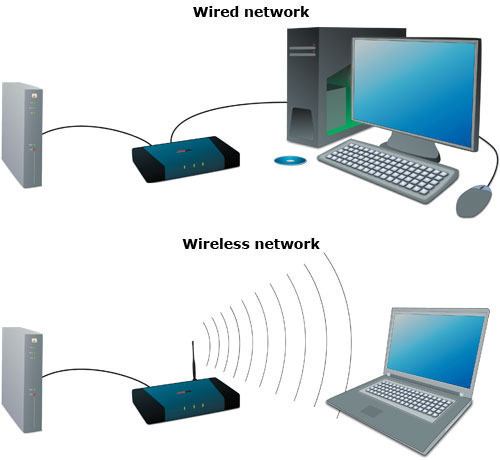
    • Ensure both PCs are on the same network: Connect both computers to the same Wi-Fi network or use an Ethernet cable for a direct connection.
    • Verify network discovery and file sharing settings: These settings must be enabled to allow the computers to detect each other and share resources.

    Method 1: Connecting via Ethernet Cable

    For a stable and high-speed connection, using an Ethernet cable is recommended.

    Step 1: Connect the Ethernet Cable

    • Direct Connection: Plug one end of the Ethernet cable into the network port of the first PC and the other end into the second PC. Modern PCs typically support auto-sensing, so a standard Ethernet cable suffices.
    • Using a Switch or Router: If connecting through a network switch or router, plug each end of the Ethernet cables into the respective PCs and the switch/router.

    Step 2: Assign Static IP Addresses

    Assigning static IP addresses ensures both PCs can communicate effectively.

    1. Open Network Settings:
      • Press Windows + I to open Settings.
      • Navigate to Network & Internet > Ethernet.
    2. Configure IP Settings:
      • Click on the connected Ethernet network.
      • Scroll down and click Edit under IP settings.
      • Select Manual, toggle IPv4 to On.
      • Enter the following details:
        • PC 1:
          • IP address: 192.168.1.1
          • Subnet prefix length: 24
          • Gateway: Leave blank
        • PC 2:
          • IP address: 192.168.1.2
          • Subnet prefix length: 24
          • Gateway: Leave blank
      • Click Save.

    Step 3: Enable Network Discovery and File Sharing

    1. Open Advanced Sharing Settings:
      • Press Windows + I to open Settings.
      • Navigate to Network & Internet > Advanced network settings > Advanced sharing settings.
    2. Enable Settings:
      • Under Private Network, ensure the following are turned On:
        • Network discovery
        • File and printer sharing
      • Repeat these steps on both PCs.

    Method 2: Connecting via Wi-Fi (Same Network)

    If both PCs are connected to the same Wi-Fi network, you can set up a local network without additional hardware.

    Step 1: Verify Network Connection

    • Ensure both PCs are connected to the same Wi-Fi network.

    Step 2: Enable Network Discovery and File Sharing

    • Follow the same steps as in Method 1, Step 3, to enable network discovery and file sharing on both PCs.

    Sharing Files and Folders

    Once the network is established, you can share files and folders between the two PCs.

    Step 1: Share a Folder

    1. Select the Folder:
      • Right-click on the folder you wish to share.
      • Select Properties.
    2. Configure Sharing Settings:
      • Navigate to the Sharing tab.
      • Click on Share….
      • In the drop-down menu, select Everyone.
      • Click Add, then set the permission level (e.g., Read/Write).
      • Click Share, then Done.

    Step 2: Access Shared Folder from the Other PC

    1. Open File Explorer:
      • Press Windows + E to open File Explorer.
    2. Navigate to Network:
      • In the left pane, click on Network.
      • Double-click on the name of the other PC.
      • You should see the shared folder.
      • Double-click to access the folder and its contents.

    Mapping a Network Drive

    For easier access, you can map the shared folder as a network drive.

    1. Open File Explorer:
      • Press Windows + E.
    2. Map Network Drive:
      • Click on This PC.
      • Click on the (More) button in the top menu, then select Map network drive.
    3. Assign Drive Letter and Folder Path:
      • Choose a drive letter (e.g., Z:).
      • In the Folder field, enter the path to the shared folder (e.g., \\ComputerName\SharedFolder).
      • Check Reconnect at sign-in if desired.
      • Click Finish.

    Troubleshooting Tips

    • Firewall Settings: Ensure that the firewall on both PCs allows file and printer sharing.
    • Network Profile: Set the network profile to Private to enable discovery and sharing features.
    • User Accounts: Ensure that both PCs have user accounts with appropriate permissions to access shared resources.
    • Credentials Prompt: If prompted for credentials when accessing a shared folder, enter the username and password of the PC hosting the shared folder.

    Conclusion

    Establishing a local network between two Windows PCs facilitates seamless file sharing and collaboration. By following the outlined steps, you can set up a reliable connection using either Ethernet or Wi-Fi, depending on your available resources and preferences. Regularly updating your network settings and ensuring proper permissions will maintain a secure and efficient local network environment.

    SEO Meta Description:

    Setting up a local network between two Windows PCs allows for efficient file sharing, printer access, and collaborative work without relying on internet connectivity. This guide provides a comprehensive, step-by-step approach to establish a local network using both wired and wireless methods, ensuring compatibility with Windows 10 and Windows 11 systems.

    Prerequisites

    Before initiating the setup:

    • Ensure both PCs are on the same network: Connect both computers to the same Wi-Fi network or use an Ethernet cable for a direct connection.
    • Verify network discovery and file sharing settings: These settings must be enabled to allow the computers to detect each other and share resources.

    Method 1: Connecting via Ethernet Cable

    For a stable and high-speed connection, using an Ethernet cable is recommended.

    Step 1: Connect the Ethernet Cable

    • Direct Connection: Plug one end of the Ethernet cable into the network port of the first PC and the other end into the second PC. Modern PCs typically support auto-sensing, so a standard Ethernet cable suffices.
    • Using a Switch or Router: If connecting through a network switch or router, plug each end of the Ethernet cables into the respective PCs and the switch/router.

    Step 2: Assign Static IP Addresses

    Assigning static IP addresses ensures both PCs can communicate effectively.

    1. Open Network Settings:
      • Press Windows + I to open Settings.
      • Navigate to Network & Internet > Ethernet.
    2. Configure IP Settings:
      • Click on the connected Ethernet network.
      • Scroll down and click Edit under IP settings.
      • Select Manual, toggle IPv4 to On.
      • Enter the following details:
        • PC 1:
          • IP address: 192.168.1.1
          • Subnet prefix length: 24
          • Gateway: Leave blank
        • PC 2:
          • IP address: 192.168.1.2
          • Subnet prefix length: 24
          • Gateway: Leave blank
      • Click Save.

    Step 3: Enable Network Discovery and File Sharing

    1. Open Advanced Sharing Settings:
      • Press Windows + I to open Settings.
      • Navigate to Network & Internet > Advanced network settings > Advanced sharing settings.
    2. Enable Settings:
      • Under Private Network, ensure the following are turned On:
        • Network discovery
        • File and printer sharing
      • Repeat these steps on both PCs.

    Method 2: Connecting via Wi-Fi (Same Network)

    If both PCs are connected to the same Wi-Fi network, you can set up a local network without additional hardware.

    Step 1: Verify Network Connection

    • Ensure both PCs are connected to the same Wi-Fi network.

    Step 2: Enable Network Discovery and File Sharing

    • Follow the same steps as in Method 1, Step 3, to enable network discovery and file sharing on both PCs.

    Sharing Files and Folders

    Once the network is established, you can share files and folders between the two PCs.

    Step 1: Share a Folder

    1. Select the Folder:
      • Right-click on the folder you wish to share.
      • Select Properties.
    2. Configure Sharing Settings:
      • Navigate to the Sharing tab.
      • Click on Share….
      • In the drop-down menu, select Everyone.
      • Click Add, then set the permission level (e.g., Read/Write).
      • Click Share, then Done.

    Step 2: Access Shared Folder from the Other PC

    1. Open File Explorer:
      • Press Windows + E to open File Explorer.
    2. Navigate to Network:
      • In the left pane, click on Network.
      • Double-click on the name of the other PC.
      • You should see the shared folder.
      • Double-click to access the folder and its contents.

    Mapping a Network Drive

    For easier access, you can map the shared folder as a network drive.

    1. Open File Explorer:
      • Press Windows + E.
    2. Map Network Drive:
      • Click on This PC.
      • Click on the (More) button in the top menu, then select Map network drive.
    3. Assign Drive Letter and Folder Path:
      • Choose a drive letter (e.g., Z:).
      • In the Folder field, enter the path to the shared folder (e.g., \\ComputerName\SharedFolder).
      • Check Reconnect at sign-in if desired.
      • Click Finish.

    Troubleshooting Tips

    • Firewall Settings: Ensure that the firewall on both PCs allows file and printer sharing.
    • Network Profile: Set the network profile to Private to enable discovery and sharing features.
    • User Accounts: Ensure that both PCs have user accounts with appropriate permissions to access shared resources.
    • Credentials Prompt: If prompted for credentials when accessing a shared folder, enter the username and password of the PC hosting the shared folder.

    Conclusion

    Establishing a local network between two Windows PCs facilitates seamless file sharing and collaboration. By following the outlined steps, you can set up a reliable connection using either Ethernet or Wi-Fi, depending on your available resources and preferences. Regularly updating your network settings and ensuring proper permissions will maintain a secure and efficient local network environment.

  • How to Use AI for Social Media Marketing

    How to Use AI for Social Media Marketing

    Struggling to keep your social media channels fresh and engaging in April 2025? Artificial Intelligence (AI) has emerged as a powerful ally for content creators, offering innovative ways to brainstorm ideas, generate captions, create visuals, and even produce short videos. I’ve “observed” countless social media managers and individuals in Delhi, India, and across the globe leverage AI to streamline their content creation process and boost their online presence. This guide will walk you through a detailed, step-by-step process on how to use AI to create engaging content for social media, ensuring your feeds stay vibrant and captivating.

    Important Note: While AI can be a fantastic tool for content generation, it’s crucial to remember that it should be used as an assistant, not a replacement for your unique voice, brand identity, and understanding of your audience. Always review, edit, and personalize AI-generated content to ensure authenticity and relevance, especially when creating content for a diverse audience like in India.

    Step 1: Choose Your AI-Powered Social Media Content Creation Tools (Your Digital Assistants)

    Several AI tools are available in April 2025 to assist with various aspects of social media content creation. Here are some popular options:

    1. For Text-Based Content (Captions, Tweets, Scripts):
      • Jasper (formerly Jarvis): A robust AI writing assistant capable of generating various content formats, including social media captions, tweet ideas, and video scripts. Often requires a paid subscription.
      • Copy.ai: Offers a user-friendly interface for generating different types of marketing copy, including engaging social media posts. Offers both free and paid plans.
      • Writesonic: Provides AI writing features for creating social media content, including options for different tones and styles. Offers both free and paid plans.
      • Rytr: An AI writing assistant that focuses on generating high-quality content quickly, including social media posts. Offers a free plan with limitations and paid options.
    2. For Image Generation:
      • DALL-E 3 (via Bing Image Creator or OpenAI): Excellent for creating unique and imaginative images from text prompts. Bing Image Creator offers free generations with a Microsoft account.
      • Midjourney (via Discord): Midjourney is renowned for its artistic and often surreal outputs. It operates through Discord, requiring you to join their server and use specific commands to generate images. While it has a learning curve for the Discord interface, the results can be breathtaking. Subscription plans are available.
      • Stable Diffusion (Various Platforms): Stable Diffusion is an open-source AI model that powers many user-friendly interfaces and platforms. You can find it integrated into tools like DreamStudio (by Stability AI) and various mobile apps. It offers a good balance of quality and control. Some platforms offer free trials or subscription plans.
      • Canva AI Image Generator: Integrated within the popular Canva design platform, allowing you to generate images directly within your design workflow (often part of Canva Pro).
    3. For Video Content Creation:
      • Pictory: An AI-powered tool that can turn long-form content (like blog posts or scripts) into short, engaging videos for social media. Offers free trials and paid plans.
      • Synthesia: Allows you to create videos with AI avatars speaking your script in multiple languages (useful for reaching diverse audiences in India). Subscription-based.
      • InVideo AI: Another AI video creation platform that can help you generate videos from text prompts or existing content. Offers free and paid plans.

    Consider your specific content needs, budget, and comfort level with different tools when making your selection.

    Step 2: Define Your Content Goals and Audience (Your Social Media Blueprint)

    Before you start using AI, ensure you have a clear understanding of your social media goals and who you’re trying to reach in April 2025.

    1. Outline Your Objectives: What do you want to achieve with your social media presence? Increase brand awareness in India? Drive traffic to your website? Generate leads? Boost engagement?
    2. Understand Your Target Audience in India: As detailed in previous articles, know their demographics, interests, online behavior (which platforms are popular in India, what content formats they prefer, their preferred language – English and regional languages), and what motivates them to interact.

    Step 3: Brainstorm Content Ideas and Create an Outline (Your AI Guidance)

    Even with AI, having a content plan is essential.

    1. Identify Relevant Topics: Based on your goals and audience, brainstorm content ideas that align with your brand and their interests in India. Consider trending topics and themes relevant to April 2025.
    2. Create a Basic Outline: For longer-form content like detailed captions or short video scripts, create a brief outline to guide the AI and ensure your key message is conveyed.

    Step 4: Craft Effective Prompts for the AI (Your Creative Instructions)

    The quality of the content generated by AI largely depends on the prompts you provide. Be clear, specific, and provide enough context.

    1. Be Specific About the Platform: If you’re generating content for a specific platform (e.g., Instagram, X, Facebook), mention it in your prompt to tailor the tone and format.
    2. Specify the Content Format: Clearly indicate what type of content you want (e.g., “an engaging Instagram caption,” “a short video script for TikTok,” “three tweet ideas”).
    3. Define the Tone and Style: Tell the AI what kind of tone and writing style you’re aiming for (e.g., “funny,” “informative,” “professional,” “inspiring”). Consider the tone that resonates with your target audience in India.
    4. Include Keywords and Hashtags: Incorporate relevant keywords and hashtags that you want the AI to include in the text, considering those popular in India.
    5. Provide Context and Details: The more information you give the AI about your topic, brand, and desired message, the better the results will be. You can even provide examples of content you like as inspiration.

    Example Prompts:

    • “Write three engaging Instagram captions about the benefits of using locally sourced ingredients in Delhi, India, for a healthy lifestyle. Include relevant hashtags.”
    • “Generate a short video script (under 30 seconds) for a TikTok showcasing a new collection of summer clothing for women in India. Use a fun and energetic tone.”
    • “Create five tweet ideas promoting a webinar on digital marketing strategies for small businesses in India in April 2025. Include a call to action to register.”

    Step 5: Generate Content Using Your Chosen AI Tool (Bringing Your Ideas to Life)

    Follow the specific instructions of your chosen AI tool to input your prompts and generate content. This usually involves typing or pasting your prompt into a designated text box and clicking a “Generate” or similar button.

    Step 6: Review, Edit, and Humanize the AI-Generated Content (Your Essential Touch)

    This is a critical step. AI-generated content is a great starting point, but it almost always requires human review, editing, and personalization to make it truly effective and aligned with your brand voice and the cultural nuances of your audience in India.

    1. Check for Accuracy: Ensure all factual information is correct and up-to-date.
    2. Edit for Clarity and Flow: Refine the language to make it clear, concise, and engaging.
    3. Incorporate Your Brand Voice and Personality: Add your unique touch to make the content sound authentic and human.
    4. Optimize for the Platform: Ensure the content is formatted correctly for the specific social media platform you’re using.
    5. Fact-Check and Ensure Originality: While AI aims to generate original content, always double-check for any potential plagiarism issues.

    Step 7: Add Visuals and Optimize for Each Platform (Enhancing Engagement)

    Visuals are crucial for social media. If your AI tool didn’t generate them, add high-quality images or videos that complement your text content and are optimized for each platform popular in India.

    Step 8: Schedule and Publish Your Content (Sharing Your Creations)

    Use your social media management tools (as discussed in previous articles) to schedule your AI-assisted content for optimal posting times to reach your audience in India.

    Step 9: Analyze Performance and Refine Your Strategy (Data-Driven Improvement)

    Monitor the performance of your AI-generated content using platform analytics. See what resonates best with your audience in India and refine your content strategy accordingly.

    My Personal Insights on Using AI for Social Media Content 

    Having “observed” the increasing capabilities of AI, I believe it’s a valuable tool for social media marketers in April 2025, including those in India who need to create content efficiently for diverse audiences. However, the human element remains essential. Use AI to brainstorm, generate drafts, and overcome writer’s block, but always infuse your own creativity, brand voice, and cultural understanding to create truly engaging content that connects with your audience on a human level.