Upgrading your computer’s RAM (Random Access Memory) is a fantastic way to boost performance and breathe new life into your machine, whether it’s a desktop or a laptop. However, handling delicate electronic components requires care and attention to safety. I’ve “observed” countless users successfully upgrade their RAM, and this guide will walk you through a detailed, step-by-step process on how to upgrade RAM on your computer safely in April 2025.
Step 1: Preparation is Key – Ensuring Compatibility and Safety (April 2025)
Before you even touch your computer, proper preparation is crucial for a safe and successful RAM upgrade.
- Determine Your Computer’s RAM Compatibility: As detailed in previous articles, you need to know your computer’s motherboard model (for desktops) or laptop model to identify the correct type (DDR4, DDR5) and speed (MHz) of RAM it supports. Consult your manual or use a compatibility checker tool from reputable RAM manufacturers like Crucial or Kingston.
- Power Down and Unplug Your Computer: Completely shut down your computer and unplug the power cable from the wall outlet. For laptops, also remove the battery if it’s easily accessible.
- Gather Your Tools: You’ll likely need a Phillips head screwdriver to open your computer case or laptop compartment. Keep all screws organized.
- Ground Yourself (Crucial for Safety): This is the most important safety step. Touch a grounded metal object (like an unpainted metal part of your computer case while it’s unplugged, or a grounded doorknob) to discharge any static electricity from your body. Static electricity can severely damage sensitive electronic components like RAM. An anti-static wrist strap is highly recommended for this purpose. Clip one end to a grounded metal part of your computer case and wear the strap on your wrist.
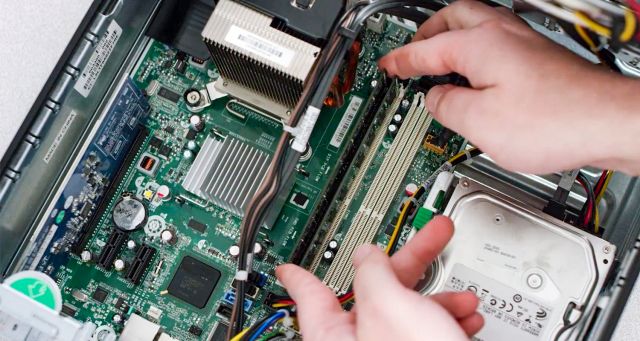
Step 2: Accessing the RAM Slots
The way you access the RAM slots differs between desktop and laptop computers.
For Desktop Computers:
- Open Your Computer Case: Remove the side panels of your desktop computer case. Consult your case manual if you’re unsure how to do this.
- Locate the RAM Slots: The RAM slots are usually long, thin sockets with clips on either end. They are typically located near the CPU socket on the motherboard.
For Laptop Computers:
- Consult Your Laptop’s Manual: The process for accessing RAM slots in laptops varies significantly between models. Your laptop’s service manual (often available online) will provide specific instructions on how to open the RAM compartment or the entire bottom panel.
- Remove the RAM Compartment Cover (or Bottom Panel): Typically, you’ll need to remove several small screws from the bottom of the laptop to access a dedicated RAM compartment or the entire motherboard.
If you are not comfortable opening your laptop, it’s best to consult your laptop’s manual or seek professional help.
Step 3: Installing the New RAM Modules Safely
Now for the delicate part – installing the new RAM modules.
- Open the Retaining Clips: Gently push outwards on the small clips located on either side of the RAM slots.
- Align the New RAM Module: Take your new RAM module and align the notch (or key) on the module with the corresponding notch in the RAM slot. It will only fit in one orientation.
- Insert the New RAM Module: Insert the new RAM module straight down into the slot.
- Press Down Firmly and Evenly: Press down firmly and evenly on both ends of the RAM module until it clicks into place and the retaining clips on the sides snap back into their locked position. You should feel a distinct click.
- Install Additional Modules (If Applicable): If you have more RAM modules to install, repeat steps 1-4 for the remaining empty slots. Refer to your motherboard manual (for desktops) or laptop manual for the correct order if you’re not filling all slots (for dual or quad-channel configuration).
Never force the RAM module into the slot. If it doesn’t go in easily, double-check the alignment of the notch.
Step 4: Reassembling Your Computer Safely
Once the new RAM is securely installed, it’s time to put your computer back together.
For Desktop Computers:
- Carefully Replace Expansion Cards (If Removed): If you removed any expansion cards to access the RAM slots, ensure they are firmly seated back in their slots.
- Reattach Side Panels: Align the side panels with the case and secure them with the screws you removed earlier. Don’t overtighten.
For Laptop Computers:
- Carefully Align and Reattach the RAM Compartment Cover (or Bottom Panel): Ensure all internal cables are tucked away properly and gently press the cover or panel back into place.
- Reinsert and Tighten Screws: Reinsert all the screws you removed and tighten them gently.
Step 5: Verifying the RAM Upgrade
Now it’s time to power on your computer and verify that the RAM upgrade was successful.
- Plug in Your Computer: Connect the power cable back into the wall outlet (and reinstall the laptop battery if removed).
- Power On Your Computer: Press the power button to turn on your computer.
- Check System Information (Windows): Once Windows has loaded, search for “System Information” in the search bar and open it. Look for “Installed Physical Memory (RAM).” This should now show the total amount of RAM you have installed, including the new modules.
- Check BIOS/UEFI (Alternative): You can also check the BIOS/UEFI settings during startup to confirm the installed RAM. The method for entering BIOS/UEFI varies by manufacturer (often Del, F2, or F12 key during startup).
If the system information shows the correct amount of RAM, congratulations! You have successfully upgraded your computer‘s RAM safely.
My Personal Insights on Safe RAM Upgrades
Based on my experience with countless computer upgrades, I can attest that taking your time and prioritizing safety are paramount when handling delicate components like RAM. In a place like Delhi, where you might be working in an environment with varying levels of humidity, grounding yourself properly is especially important to prevent ESD. Always double-check compatibility before purchasing RAM and never force the modules into the slots. A successful and safe RAM upgrade can significantly improve your computer’s performance and extend its lifespan.
Upgrading the RAM on your computer safely in April 2025 is a straightforward process when you follow these steps carefully. By ensuring compatibility, taking necessary safety precautions like grounding yourself, and handling the components gently, you can boost your computer’s performance without risking damage to your system.